Easter Bunny Cake
The Easter season is truly one of the best seasons of the year. It is a time of rejoicing and celebrating especially if you are a Christian and believe in the resurrection. Naturally, when this joyous day arrives, there are always some special treats especially for the kids.
Last year, I made a special sweet treat for the kids – White Chocolate and Coconut Egg Nests which they truly enjoyed. I had a great time making them and eating them, too! I had to exercise some self-control as it was quite a more-ish treat. This year, for a change, I thought I’ll depart from the usual easter egg treat and make a cake instead.
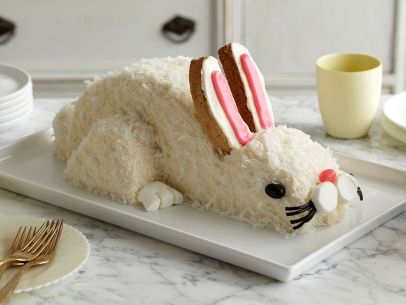
I found this wonderful and truly delightful recipe for an Easter Bunny Cake. It looks so gorgeous so I thought I ought to share it with you all. It may come in handy especially if you are looking for some delicious inspiration this Easter. Thankfully, the FoodNetwork.com granted us the permission to re-print their recipe here.
So, what are you waiting for? Get all the ingredients soon and then make this fabulous cake. It will surely wow your family and friends! Enjoy!
If you like what you see and would like to receive new recipe updates, we’d love you to subscribe to our posts or join our site. Needless to say, we’d love you to like us on Facebook and Instagram, too where you can get more recipes and updates. Thanks and happy browsing!
[printfriendly]
Click the above icon to print. To remove images for easy printing, simply click on each photo.
Ingredients
Frosting:
3 sticks (12 ounces) unsalted butter, at room temperature
6 cups confectioners’ sugar
Pinch fine salt
1 tablespoon vanilla extract
2 to 3 tablespoons milk
Bunny:
2 baked 9-inch round cake layers (your favorite recipe or a 18.25-ounce boxed cake mix)
1 1/4 cup sweetened flaked coconut
2 store-bought biscotti
1 tube pink decorating icing
2 black jelly beans
2 marshmallows
1 white jelly bean, halved lengthwise
1 pink jelly bean
1 black licorice wheel, such as Haribo
Procedure
For the frosting: Combine the butter, sugar and salt in the bowl of a stand mixer fitted with a paddle attachment (or in a large bowl if using a hand-held electric mixer). Mix on low speed until mostly incorporated. Add the vanilla, increase the speed to medium-high and mix until smooth. Adjust the consistency with milk until the frosting is easy to spread.
For the bunny: Spread a thin layer of frosting on the flat side of one cake layer, about 2/3 cup, and top with the flat side of the second cake layer. Measure 5 inches across the top of the cake and cut down through the layers, creating two layered pieces that are slightly different sizes.
Place the larger piece of cake, cut-side down, on a large platter or cake board. If using a rectangular cake board, place the larger piece so that the long edges are parallel with the long edges of the board. This is the body of the bunny. Cut the smaller piece of cake in half crosswise, so you have two layered wedges. Place one wedge in front of the body, with one flat side on the board and the other flat side against the body. The curved side will be on top. Take a serrated knife and round off the sharp edges on top of the head. Cut the tip off (the nose) at a 45-degree angle. Reserve all scraps in a bowl.
Separate the layers of the remaining wedge of cake. These will be the back legs. Round the sharp edges of the cake wedges with your knife, and add to the scrap bowl. Place one piece on each side of the bunny, with one flat side down and the other flat side facing forward (the round side towards the back of the bunny), about 1-inch from the end of the bunny’s body.
Mix the cake scraps in the bowl with a fork until mashed, and then pack into a ball with your hands. Place the ball behind the bunny’s body and adhere with a dab of frosting. This is the bunny’s tail.
Frost the entire bunny, tail and all, using 2 to 3 cups of the frosting, keeping some definition with the bunny parts, and frosting more generously around any sharp edges to give a rounded look to the bunny parts. Sprinkle the bunny with the coconut to fully cover. Gently pat to adhere.
Insert the biscotti between the head and body, pressing into the cake to secure them. These are the ears. Place the base of the ears close together at the center of the head and angle them out. Frost the front of each biscotti with some frosting. Then, using the pink decorating icing, frost a smaller strip in the center of each biscotti, going down to where the ears meet the head but not going all the way to the top.
To make the face, press a black jelly bean into each side of the head for the eyes. Cut one of the marshmallows into 3 circles, discard the middle piece, and press the 2 end circles, cut-sides-in, into the front of the face for the bunny cheeks. Take the white jelly bean halves and push them into face below the cheeks, round-sides-out, for the teeth. Place the pink jelly bean above for the nose.
Unroll the licorice wheel and cut 2 pieces about 1 1/2 inches long each. For each piece, peel the strips apart halfway down, and then cut each separated strip in half lengthwise so you end up with a piece looking a bit like a broom. Repeat with the second piece of licorice. Tuck each piece, with a dab of frosting, behind a marshmallow cheek, with the cut ends facing out, for the whiskers.
Cut the second marshmallow in half lengthwise. Make 3 slits in each half, going about halfway through (these are the toes), and place in front of the legs for the bunny’s feet. Adhere the bottom of the feet with icing if necessary.
Cook’s Note:
Take 2 1/2 sheets of parchment paper and cut in half. Line the edges of your cake board with these parchment rectangles so that they form a rectangle of open space in the middle. Build your cake on the edges of these pieces of parchment. When you are finished you can slide them away along with any excess icing and coconut.
Make sure your cakes are completely cooled before you begin to ice and cut them.
If you wish to print the recipe, there’s a print-friendly icon below the post. Click on the “remove images” box for easy and convenient printing.
Recipe and photo courtesy of FoodNetwork.com
If you like what you see and would like to receive new recipe updates, we’d love you to subscribe to our posts or join our site. Needless to say, we’d love you to like us on Facebook too where you can get more recipes and updates. Thanks and happy browsing!
Last updated on April 8th, 2020 at 12:41 pm


