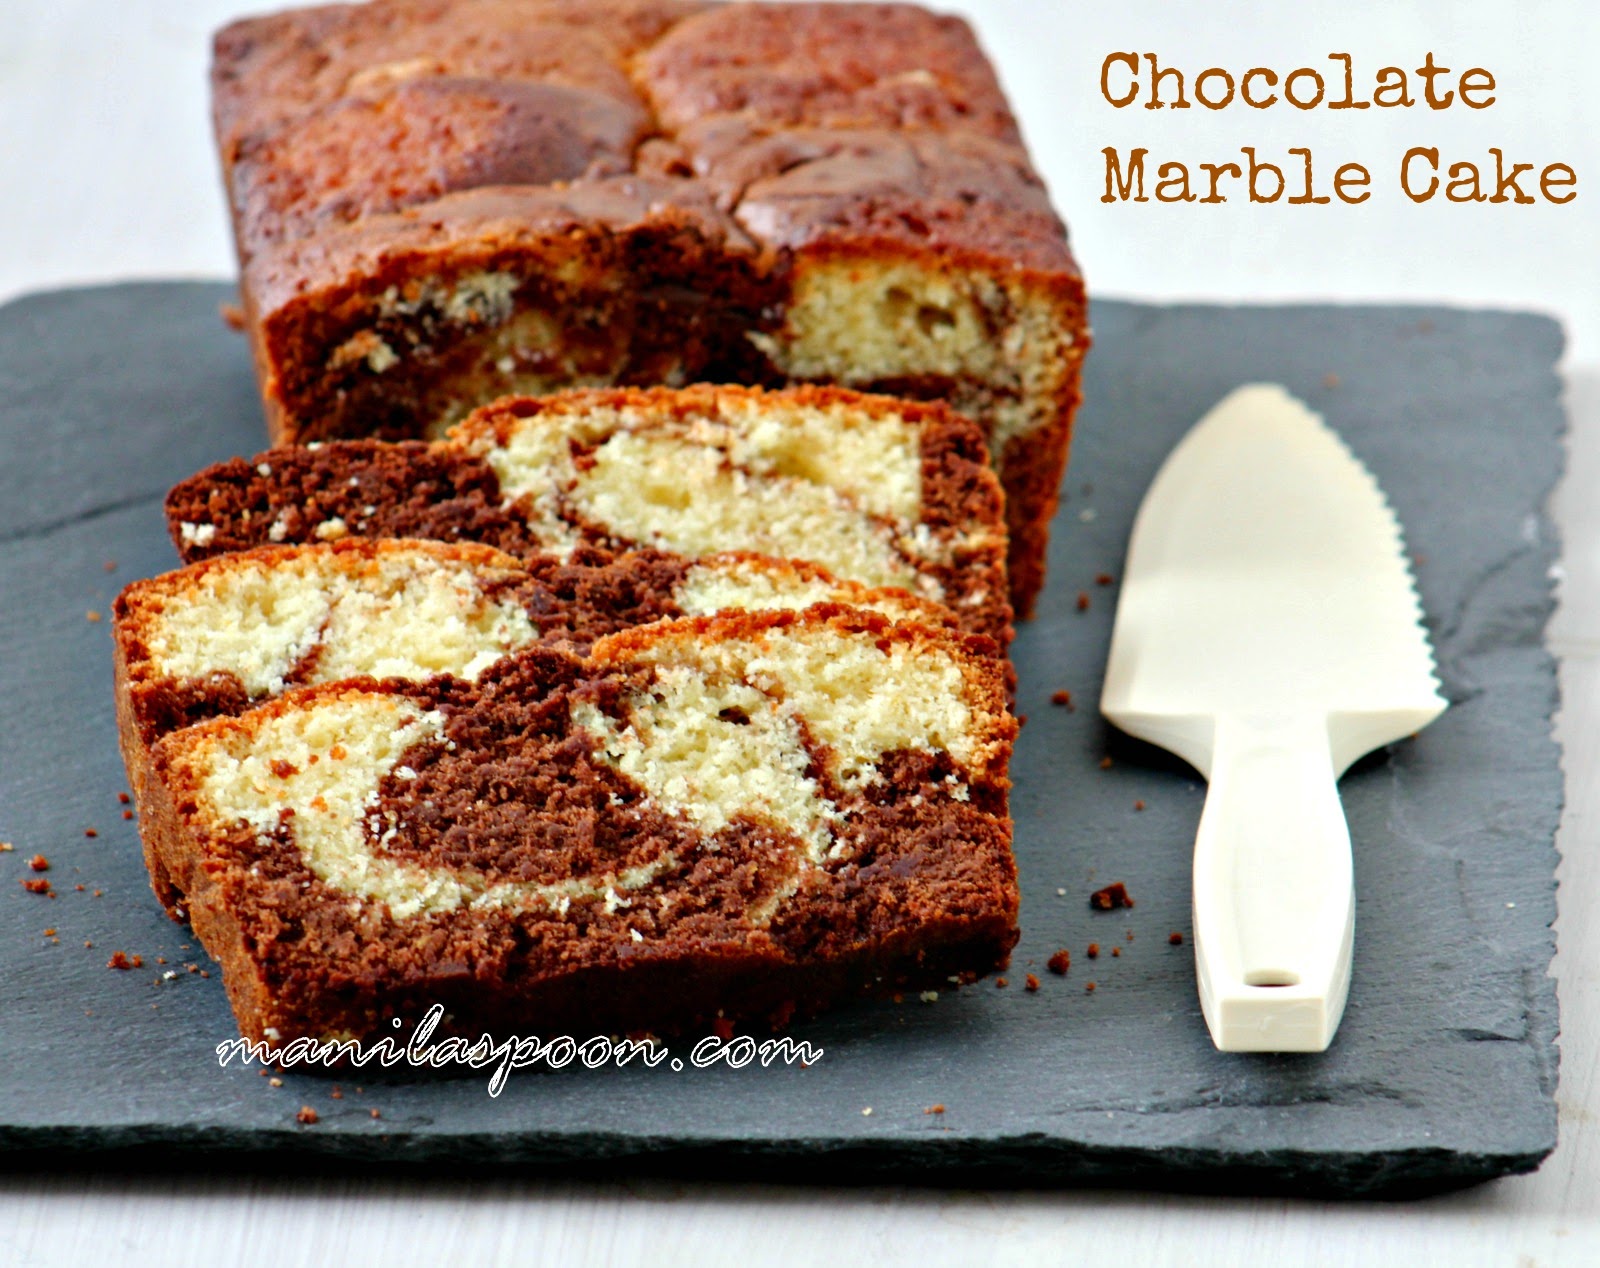
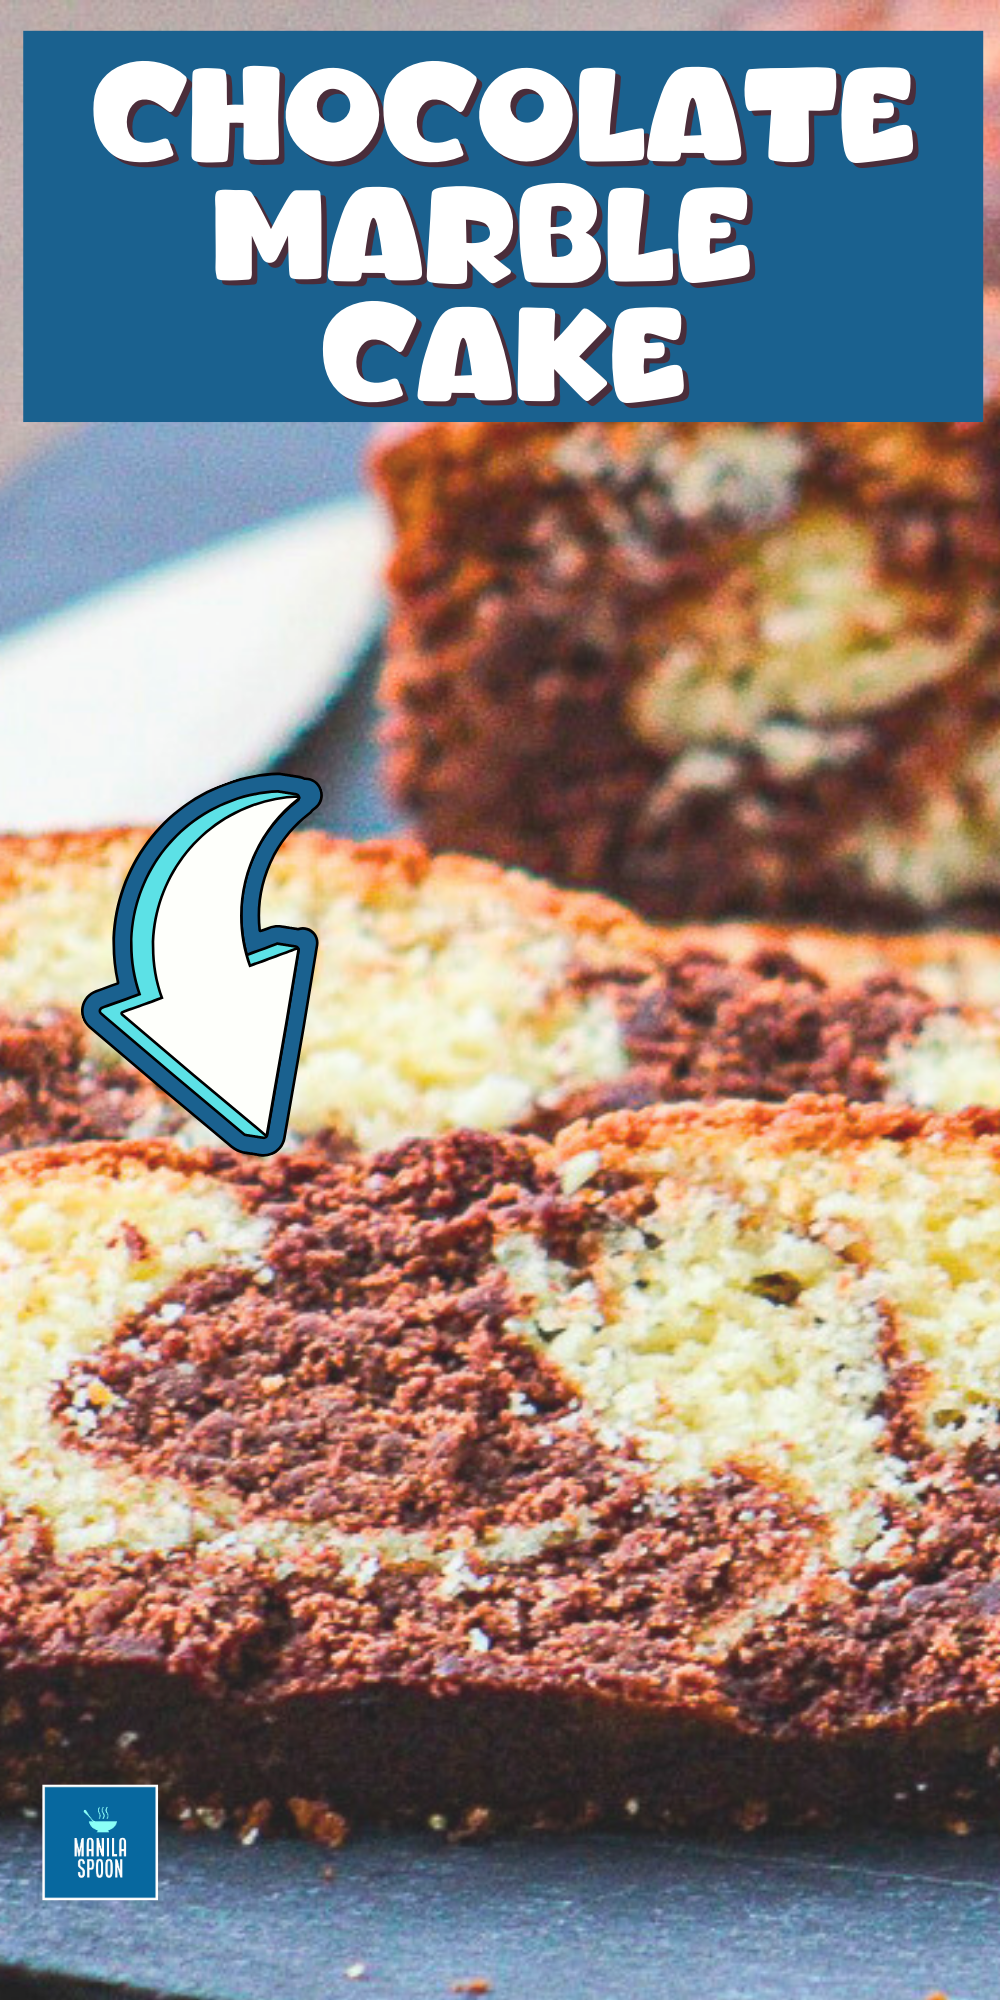
Chocolate Marble Cake
This is such a yummy cake! It is so gorgeously delicious and a must-try for any serious chocolate lover. This chocolate marble cake is perfect for Christmas, Valentine’s Day, or anytime you want a tasty chocolate dessert!
I used to be an unlikely baker. Early on, I was intimidated by baking techniques, especially when it came to cakes. I have made a few cakes here and there, but they are often pretty simple and uncomplicated. This was me just over 10 years ago.
Thankfully, with some practice and grit, I am now so in love with baking, making it my favorite weekend pastime! My daughter Sophie always helps me with baking, and she is the most excellent baker – so proud of her!
I thought I’d try to make a sponge marble cake this time as a challenge! I am glad to report that the chocolate marble loaf cake came out fine, with the classic swirls very visible, too!

This moist and flavorful cake is the perfect balance of vanilla and chocolate, with a beautiful marbled effect that’s sure to impress. Whether you’re a seasoned baker or just starting out, this recipe is easy to follow and guaranteed to satisfy your sweet tooth.
Why You Would Love This Chocolate Marble Cake Recipe
This chocolate marble cake recipe is a true crowd-pleaser, combining rich chocolate swirls with a tender vanilla base. The addition of lemon zest and dark rum gives it a unique flavor profile that sets it apart from other marble cakes. Plus, it looks so pretty and would wow your guests!

Ingredients for Chocolate Marble Cake
2 1/2 cups All-Purpose Flour
1 teaspoon Baking Powder
1 teaspoon Baking Soda
1/2 teaspoon Salt
1 1/2 cups unsalted Butter, room temperature
2 cups Sugar
6 large Eggs, room temperature
Zest and juice of 1 Lemon
4 Tablespoons dark Rum
3 Tablespoons Milk
1 pack (12 oz) dark Chocolate chips or eating chocolate of the same weight, melted
*For a non-alcoholic version, use this mixture of 4 Tablespoons pure Maple Syrup plus 1 teaspoon Almond Extract. I didn’t have any rum so I used the non-alcoholic substitute when I made this.
*Don’t be turned off by the number of eggs or sugar as this recipe makes 2 loaves. If you won’t eat all two loaves in one go, then go ahead and freeze the bread.
Step-by-Step Instructions to Make the Chocolate Marble Cake
Butter or grease 2 loaf pans (5 x 8 x 2 in size approximately). Line each pan with parchment paper. Butter the parchment paper as well.
Preheat the oven to 350F. Lower the heat to 325F if using a dark pan.
Sift together the flour, baking powder, baking soda, and salt. Set aside.
Using an electric mixer, cream the butter and sugar until pale and fluffy. Beat in the eggs one at a time, beating well after each addition.
Beat in the lemon zest and juice plus 2 tablespoons of either the rum the or maple syrup/almond mixture until well incorporated.
Gently fold in the dry ingredients. Transfer half of the mixture into another bowl.
Stir the remaining rum or maple syrup/almond mixture and milk with the melted chocolate. Beat until smooth. Blend well with half of the cake mixture. You will now have two cake batters – plain and chocolate.
Alternately, add heaping spoonfuls of the chocolate and plain mixtures on the prepared loaf pans until everything is gone. Tap the pans to level the mix. Using a knife, cut through the mixture using a swirling motion to create the marbled effect.
Bake for about 45 minutes in the preheated oven or until a tester comes out clean.
Transfer the loaves to a wire rack. Let the cakes cool in the pans for about 10 minutes, and then turn out onto the wire rack to cool completely. Slice the cakes only after they have cooled completely.
So perfect with coffee or tea.

Tips for the Perfect Marble Cake
To ensure your chocolate marble cake turns out perfectly every time, keep these tips in mind:
- Room temperature ingredients: Make sure your butter and eggs are at room temperature for easier mixing and a smoother batter.
- Don’t overmix: Once you add the dry ingredients, mix just until combined to avoid a tough cake.
- Create distinct swirls: When marbling the batters, be careful not to overmix. You want to see distinct swirls of vanilla and chocolate.
- Check for doneness: Use a toothpick or cake tester to check if the cake is done. It should come out clean or with just a few moist crumbs.
- Cool completely: Allow the cake to cool fully before slicing to ensure clean, beautiful slices.
Variations and Serving Suggestions
This versatile chocolate marble cake recipe can be adapted in many ways:
- Frosting: While delicious on its own, you can add a simple chocolate ganache or vanilla glaze for extra indulgence.
- Mix-ins: Try adding chopped nuts or dried fruit to the batter for added texture.
- Flavor twists: Experiment with different extracts like almond or orange instead of rum for a unique flavor profile.
Serve slices of this moist marble cake with a cup of coffee or tea for the perfect afternoon treat. It’s also great for breakfast or as a dessert topped with a scoop of vanilla ice cream.
Why This Chocolate Marble Cake Recipe Stands Out
What makes this chocolate marble cake recipe special is its perfect balance of flavors and textures. The addition of lemon zest and dark rum elevates the taste, while the marbling technique creates a visually stunning dessert. It’s a versatile cake that’s equally suitable for casual family gatherings or more formal occasions.Whether you’re a chocolate lover, a vanilla fan, or someone who appreciates the best of both worlds, this marble cake is sure to become a favorite in your recipe collection. Its moist texture, rich flavor, and beautiful appearance make it a standout dessert that will have everyone asking for seconds.
FAQs About Chocolate Marble Cake
- Can I make this cake without alcohol?
Yes, you can substitute the rum with an equal amount of milk or non-alcoholic vanilla extract. - How long does this marble cake stay fresh?
When stored in an airtight container at room temperature, this cake stays fresh for up to 3-4 days. - Can I freeze this chocolate marble cake?
Absolutely! Wrap it tightly in plastic wrap and aluminum foil, and it can be frozen for up to 3 months. - What’s the best way to achieve a good marble effect?
Use a knife or skewer to gently swirl the batters together, being careful not to overmix. This will create distinct swirls of vanilla and chocolate. - Can I use this recipe to make cupcakes instead of a loaf cake?
Yes, you can use this batter to make marble cupcakes. Adjust the baking time to about 18-20 minutes for standard-sized cupcakes.

This chocolate marble cake recipe is a delightful treat that combines the best of both vanilla and chocolate worlds. With its moist texture, rich flavor, and beautiful marbled appearance, it’s sure to become a staple in your baking repertoire. Whether you’re serving it for a special occasion or simply enjoying a slice with your afternoon tea, this cake is guaranteed to impress. Happy baking!
Recipe is adapted from CHOCOLATE MARBLE CAKE from CRAVE (A passion for Chocolate) by Maureen McKeon.

Chocolate Marble Cake
Ingredients
- 2 1/2 cups All-Purpose Flour
- 1 teaspoon Baking Powder
- 1 teaspoon Baking Soda
- 1/2 teaspoon Salt
- 1 1/2 cups unsalted Butter, room temperature
- 2 cups Sugar
- 6 large Eggs, room temperature
- Zest and juice of 1 large Lemon
- 4 Tablespoons dark Rum
- 3 Tablespoons Milk
- 12 oz pack dark Chocolate chips or eating chocolate of the same weight, melted
Instructions
- Butter or grease 2 loaf pans (5 x 8 x 2 in size approximately). Line each pan with parchment paper. Butter the parchment paper as well.
- Preheat the oven to 350F. Lower the heat to 325F if using a dark pan.
- Sift together the flour, baking powder, baking soda, and salt. Set aside.
- Using an electric mixer, cream the butter and sugar until pale and fluffy. Beat in the eggs one at a time, beating well after each addition.
- Beat in the lemon zest and juice plus 2 tablespoons of either the rum or maple syrup/almond mixture until well-incorporated.
- Gently fold in the dry ingredients. Transfer half of the mixture into another bowl.
- Stir the remaining rum or maple syrup/almond mixture and milk with the melted chocolate. Beat until smooth. Blend well with half of the cake mixture. You will now have two cake batters – plain and chocolate.
- Alternately add heaping spoonfuls of the chocolate and plain mixtures on the prepared loaf pans until everything is gone. Tap the pans to level the mixture. Using a knife, cut through the mixture using a swirling motion to create the marbled effect.
- Bake for about 45 minutes in the preheated oven or until a tester comes out clean.
- Transfer the loaves to a wire rack. Let the cakes cool in the pans for about 10 minutes and then turn out onto the wire rack to cool completely. Slice the cakes only after they have cooled completely.
- So perfect with coffee or tea.
Notes
Nutrition
Last updated on December 3rd, 2024 at 06:42 pm


Looks great, I have to try this!
Thanks for stopping by Eugen! Please enjoy.
Hi! Can I use a round cake pan for this recipe?
The reason why we use a taller 9×5 pan for this is so that the marbling appears and becomes more visible. That may not be so in a shallower pan. I haven’t used a round cake pan because of that, but if you want you can – just adjust the baking time because it’s shallower.
Love this cake..the texture looks amazing!
I enjoyed making this bread, Shema. Thanks and glad to see you stop by. 🙂
love your filipino recipes, my granddaughter is 1/4 filipino and we love to make your recipes